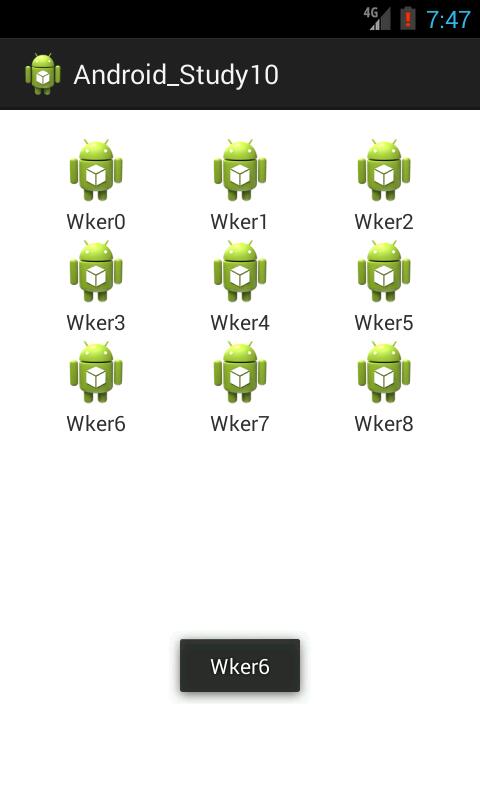
网格视图
就是一个控件,在这个控件中类似于列表框控件,可以添加一个个小的视图,其实用起来就和一个格子一个格子的列表控件一样。
1
2
3
4
5
6
7
8
9
10
11
12
13
14
15
16
17
18
| <RelativeLayout xmlns:android="http://schemas.android.com/apk/res/android"
xmlns:tools="http://schemas.android.com/tools"
android:layout_width="match_parent"
android:layout_height="match_parent"
android:paddingBottom="@dimen/activity_vertical_margin"
android:paddingLeft="@dimen/activity_horizontal_margin"
android:paddingRight="@dimen/activity_horizontal_margin"
android:paddingTop="@dimen/activity_vertical_margin"
tools:context="com.example.android_study10.MainActivity" >
<GridView
android:id="@+id/gridview"
android:numColumns="3"
android:layout_width="match_parent"
android:layout_height="match_parent"
></GridView>
</RelativeLayout>
|
布局比较简单,numColumns这个属性就是设置一行有几个格子。
布局完这个之后就来布局每个项目的布局。
1
2
3
4
5
6
7
8
9
10
11
12
13
14
15
16
17
18
19
20
21
| <?xml version="1.0" encoding="utf-8"?>
<LinearLayout xmlns:android="http://schemas.android.com/apk/res/android"
android:layout_width="match_parent"
android:layout_height="match_parent"
android:gravity="center_horizontal"
android:orientation="vertical" >
<ImageView
android:id="@+id/imageView"
android:layout_width="wrap_content"
android:layout_height="wrap_content"
android:src="@drawable/ic_launcher"
/>
<TextView
android:id="@+id/textview"
android:layout_width="wrap_content"
android:layout_height="wrap_content"
android:text="Wker"
/>
</LinearLayout>
|
这个就是一个上面图片,下面文字的一个布局,用来存储每个项目。
接下来我们来编写代码。
首先我们先来定义控件和一个图片资源数组:
1
2
3
| private ListAdapter ad;
private GridView Gv1;
private int[] images = {R.drawable.ic_launcher,R.drawable.ic_launcher,R.drawable.ic_launcher,R.drawable.ic_launcher,R.drawable.ic_launcher,R.drawable.ic_launcher,R.drawable.ic_launcher,R.drawable.ic_launcher,R.drawable.ic_launcher};
|
为了简单起见,我就放了几个自带的图片。
1
2
3
| Gv1 = (GridView) findViewById(R.id.gridview);
ad = getAdapter();
Gv1.setAdapter(ad);
|
然后我们初始化控件,再设置一个适配器。
适配器获取的代码:
1
2
3
4
5
6
7
8
9
10
11
| private ListAdapter getAdapter() {
List<HashMap<String,Object>> list = new ArrayList<HashMap<String,Object>>();
for (int i = 0; i < images.length; i++) {
HashMap<String,Object> hm = new HashMap<String,Object>();
hm.put("txt", "Wker"+i);
hm.put("img", images[i]);
list.add(hm);
}
SimpleAdapter adapter = new SimpleAdapter(this, list, R.layout.item, new String[] {"txt","img"}, new int[] {R.id.textview,R.id.imageView});
return adapter;
}
|
首先先定义一个HashMap的列表,一个文字对应一个组件数据。
然后我们用for循环逐渐添加,最后我们初始化这个SimpleAdapter,比较重要的就是最后两个控件,是一一对应的,我之前也说过,那个R.layout.item就是我们的项目布局。
1
2
3
4
5
6
7
| Gv1.setOnItemClickListener(new OnItemClickListener() {
@Override
public void onItemClick(AdapterView<?> parent, View view, int position, long id) {
Toast.makeText(MainActivity.this, (CharSequence) ((HashMap<String,Object>)((SimpleAdapter)ad).getItem(position)).get("txt"), Toast.LENGTH_SHORT).show();;
}
});
|
添加个事件,注意的是,我们的适配器的某个项目使我们集合中的某个元素,这样我们就能够实现了,而且ListAdapter是SimpleAdapter的父类。